forms
- Insert a selection (Select field)
- Insertion of a single-line input field (input field)
- Send button
- Form Options
- Testing a form
The form can be filled out by a visitor to your homepage and sent to you. The advantage is that the visitor does not need to have an email address or an email client installed to fill out the form.
Forms can be easily created in the editor without any programming knowledge. The bluetronix software automatically corrects field names and form elements. Sent forms are generally stored in the form archive  Tools -> Form Archive saved. In addition, the forms can be forwarded to an email address. An automatic confirmation to the sender can also be set.
The form can be transmitted in text mode (field -> name: Mustermann) and in HTML mode (1:1 the completed form mask).
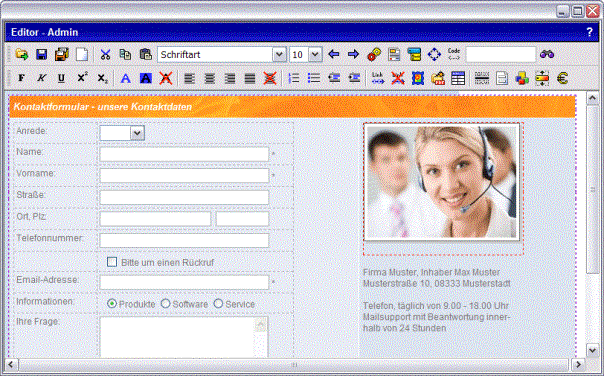
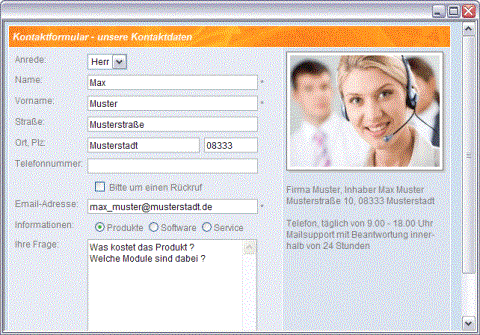
In this example, the contact form shown in the image above is to be created.
To align the form fields, a transparent table used with border width 0.
 Forms are displayed in the editor with a purple colored dashed border. The form frame must be taken into account, especially when using several forms on one page.
Insert a selection (Select field)
Click in the left table field (1st line) and enter the designation "Salutation". Go to the right panel and click on the in the editor  form Symbol.
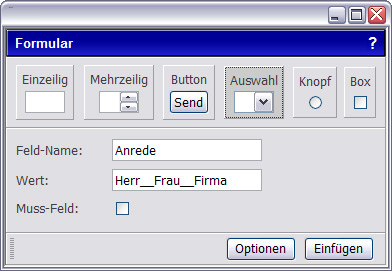
In the form window, click selection . Enter "Salutation" as the field name. In the "Values" field, the values "Mr.", "Mrs." and "Company" are now entered separated by "__" characters.
Insertion of a single-line input field (input field)
Switch to the 2nd line and enter "Name" in the left table field. Click in the right panel and open that form Window.
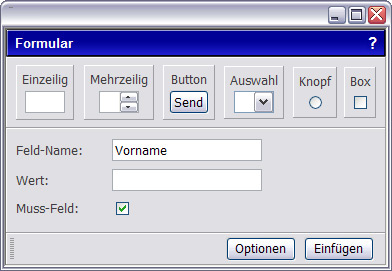
Enter the first name under "Field name" and activate the "Mandatory field" option (this means that the field must be filled out, otherwise the form cannot be sent). A default value can be specified under "Value". In this example, the field is left blank. Confirm with Insert . The size of the input field can now be specified in the editor. To do this, click on the input field and drag the field to the desired size.
Proceed in the same way with the remaining input fields.
Automatic confirmation to the sender: If you enter "Email" under "Field name", the sender will automatically receive a confirmation e-mail after the form has been sent, provided he has specified an e-mail address.
Send button
Now the so-called "send button" is inserted. With a click on this button the visitor can send the form.
To do this, open this again form window and click button . The "Name" and "Value" fields remain empty and "Send" remains the default under "Function". Click Insert.
Under Button -> Function (selection field) you will also find the Reset (reset form to initial state), Back, Print, Refresh and Button (normal button) functions.
Form Options
Finally, the form options are set. To do this, click in the editor form and in the form window options .
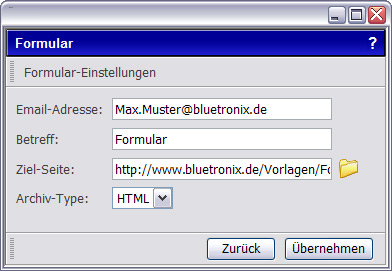
If you want the form to be forwarded by email, enter the relevant email address under email address.
The "Subject" is the designation of the form, for example "Contact Form". This appears in the email subject (when forwarded) and in the form archive Tools -> Form Archive as form name.
Under "Target page" you can specify a page that the visitor sees after submitting the form. For example: "The form was sent successfully". In general, this page is already pre-assigned.
The archive type indicates the submission of the form. In text mode, the field name is saved with the entered value. For example "Name: Mustermann". In HTML mode, the form is saved 1:1 with the entered values.
Testing a form
Save the page, close the editor and test the form. Fill in all fields and click " Send “. If fields that need to be filled out are empty, a warning message appears.
In the editing mode of your website, open the form archive under Tools -> Form Archive .
If you have specified an email address for forwarding, check the email receipt.
The module form for installation can be found in the chapter module form .
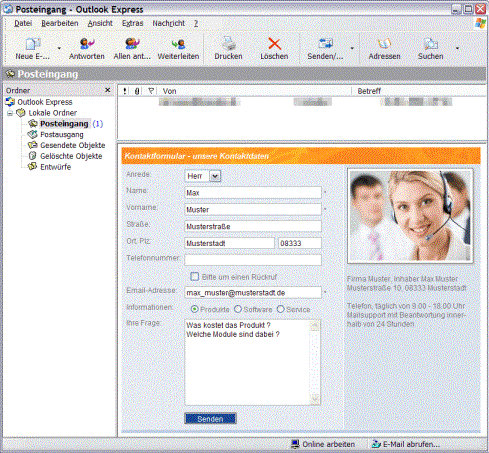
Receiving a form in HTML mode in the form archive
Receiving a form in HTML mode in the mail program.
You can find more information about the forms at The form module .
Homepage software chapter selection