Newsletter
Inform your visitors about the latest news and offers on your website with a newsletter. The newsletter system sends an email to several recipients at the same time, for example your registered customers in the shop system or forum. A newsletter can be elaborately designed with the editor.
The prerequisite for the newsletter system is the installation of the newsletter module as in the chapter Newsletter module described.
 SPAM note – Only send a newsletter to users who also want to receive it or who have registered to receive the newsletter. Do not remove the unsubscribe link from the newsletter template. Do not re-enable users who have unsubscribed from sending. Complaints about SPAM (unwanted e-mail dispatch) can result in the termination of your web package in accordance with our terms and conditions.
send newsletters
Open in the main menu  News -> Send newsletter . The newsletter is written as usual with the editor . Text, images and documents can be easily inserted. The newsletter can be extensively designed with the help of the CSS editor. With the function
  Open and
  Save on computer or.
  Save as newsletters can be archived and used again at any time.
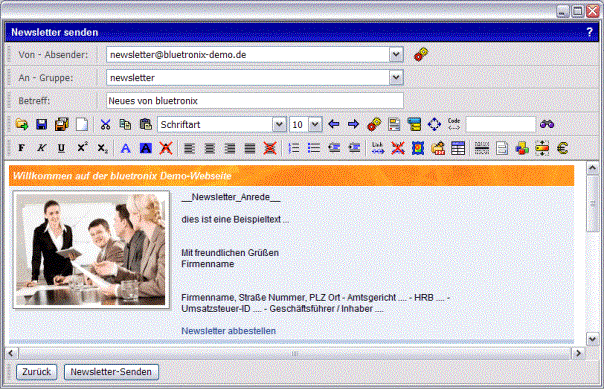
As can be seen in the picture above, the editor has additional menu bars such as the sender, the group and the subject when called up via newsletter.
The target group for the newsletter is defined under Groups. This can be the group shop customers or forum users, for example. In this way, targeted newsletters can be sent to different customers and user groups.
The mark __Newsletter_Salutation__ is automatically replaced by a personal salutation, for example "Dear Mr. ..." or "Dear company ..." when sending a newsletter.
A link is included in each newsletter sent " Unsubscribe Newsletter ", with which the recipient can revoke the newsletter subscription at any time.
Newsletter address management
In the address management you will find all users registered for the newsletter. Here users can be manually added, deleted or deactivated for the newsletter dispatch.
Start address management in edit mode on your homepage at News -> Newsletter address management . In the database table view you can now add users manually.
Import newsletter address book from Outlook
The following describes how address lists, for example from Outlook, can be imported into the newsletter system.
Step 1 - Export address book from Outlook
To do this, start Outlook. Choose File -> Export -> Address Book . Mark your choiche Text file (comma delimited) and click Export . click on Search and enter a file name, for example address book.csv . Then click on further .
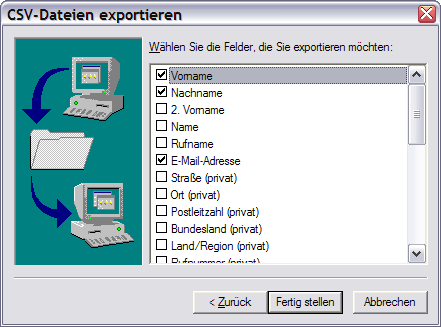
Check the box Salutation (if available) , First name , last name , E-mail address, uncheck all other boxes and click Complete .
Step 2 - Format the columns in Excel
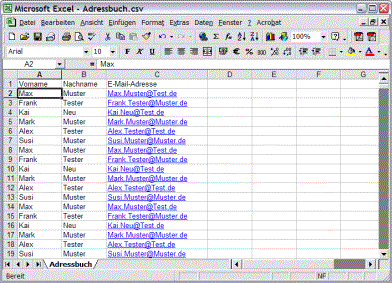
Start Excel and select File -> Open . Select as file type Text files (*.csv) . In the file window, click the file address book.csv (this is marked in grey) and click Open . The file is then loaded into Excel.
The address book now has the following columns: First name, last name, email address .
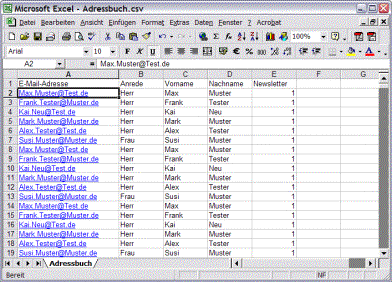
For the import into the newsletter system, these columns must be in the form Email, title, first name, last name, newsletter be adjusted. To do this, select the columns in Excel First name and last name and click Edit -> Cut . Now click in the 1st field of the Column E and choose Edit -> Paste . Mark the Columns A and B and click Edit -> Delete Cells . In the still free Column B If there are no entries yet, enter the salutation for the person, for example Mr., Mrs. or company. In Column E (newsletter) a 1 (newsletter is active) must be entered for each address. The table should now look like the image below.
Finally, we remove the header, mark the line and click Edit -> Delete Cells . Click now File -> Save and confirm the warnings with YES .
Step 3 - Importing the address book into the newsletter system
Switch to the bluetronix software and start the database import under  DB -> Database Import . Click on the icon
  document management . Click to upload the import file Search , choose the file address book.csv on your local PC and click Open . Start uploading by clicking Upload file . Now select the file address book.csv (with a click on the file name) and click on Insert File .
Under Target Database select Newsletter from the selection. The "Delete existing data records" option causes all existing data records to be deleted before the import. If this option remains empty, the data records to be imported will be added to the existing ones.
Click to start the import Import . Depending on the amount of data, the import can take a few minutes. Now start the newsletter address management under News -> Newsletter address management and control the import.